CakeDC Blog

TIPS, INSIGHTS AND THE LATEST FROM THE EXPERTS BEHIND CAKEPHP

CakePHP Query Builder

CakePHP’s  database Query Builder provides a simple to use fluent interface for creating and operating database queries. It can be used to accomplish most database operations in your application, and works on all supported database systems.


Query builders allow us to create database queries that work with any supported database, without having to worry about differences between SQL implementations in the different database systems.


The CakePHP query builder uses PDO parameter binding to protect your application against SQL injection attacks. There is no need to clean strings being passed as bindings.


For creating a Query object in CakePHP, the easiest way is using find() from a Table object. In CakePHP, queries are lazily evaluated,  which means that they are not evaluated until any of the following actions happens: the query is iterated through a foreach, it’s called first(), all(), toList(), toArray(). 


You can check all the SQL queries that CakePHP is generating, you just need to enable the Database Logging. See here:  https://book.cakephp.org/4/en/orm/database-basics.html#query-logging


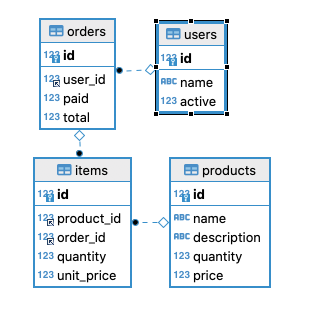
Let’s do a few samples using the Query Builder - this is the ER diagram of the database that we will be using for the queries. We have Orders, ProductsUsers and Items that will store the products sold in each order and the quantity sold.

Let’s create some queries using the Query Builder SQL Functions: https://book.cakephp.org/4/en/orm/query-builder.html#using-sql-functions. SQL Functions as part of the Query Builder are abstractions of  some commonly used SQL functions,  and they allow the ORM to choose the specific implementation your application needs based on the Database that is being used. For example, CONCAT is implemented in a different way in MySQL and Postgres, using concat() function will work if you use MySQL or Postgres


Imagine we want to build a report of the products sold, including the following:

  1. Display the product in the following format “Products.name - Products.description”.

  2. Total of products sold.

  3. Total of products in stock..

  4. Total amount on sold products.

First, we need to build the Query object using find(), this needs to be done from the Table. $query = Table->find();.

We want to get a report of the products sold and the current stock. Initially, we would need to build a subquery using ItemsTable where the information related to the products sold is present.  Don’t forget to use identifier() when referencing any column. This will tell us  the items sold per product. 

$itemsQuery = $this->Items->find() ->where(['Items.product_id' => $query->identifier('Products.id')]);

Now, let’s build each query needed for the information required:

  1. Let’s start displaying the  product in the following format: “Products.name - Products.description”. Using concat() we could get it:

    $query->select([

                'display_name' => $query->func()->concat([

                    $query->identifier('Products.name'), ' - ',  $query->identifier('Products.description')]),

            ]);

  2. Total of products sold. Using sum() we could get it, we just need to sum Items.quantity per each product,  this  is why we use $itemsQuery and then we sum the quantity per each product.

    $query->select([
      'quantity_sold' => $itemsQuery->select(['sum' => $itemsQuery->func()->sum($query->identifier('Items.quantity'))]),
    ]);


  3. To get the income, we need to multiply the Quantity of items  *  Price  and sum all of them. 

      $query->select([
              'income' => $itemsQuery->select(['sum' => $itemsQuery->func()->sum($query->newExpr('Items.quantity * Items.unit_price'))
                ])]);


  4. Stock. to get the stock we need to take advantage of the quantity_sold we just got in #2, and subtract it from the real quantity Products.quantity. For getting this, we would need to create a subquery in the FROM clause using the previous queries, and then subtract in the target query something like quantity - quantity_sold.

    $products = $query->cleanCopy()->select([
                'id' => 'ProductDetails.id',
                'price' => 'ProductDetails.price',
                'quantity' => 'ProductDetails.quantity',
                'display_name' => 'ProductDetails.displaye_name',
                'quantity_sold' => 'ProductDetails.quantity_sold',
                'income' => 'ProductDetails.income',
                'stock' => $query->newExpr('ProductDetails.quantity - ProductDetails.quantity_sold'),
            ])->from([
              'ProductDetails' => $query->cleanCopy()->select([
                    'id' => 'Products.id',
                    'price' => 'Products.price',
                    'quantity' => 'Products.quantity',
                    'display_name' => $query->func()->concat([$query->identifier('Products.name'), ' -  ', $query->identifier('Products.description')]),
                  'quantity_sold' => $itemsQuery->select(['sum' => $itemsQuery->func()->sum($query->identifier('Items.quantity'))]),
                  'income' => $itemsQuery->cleanCopy()->select(['sum' => $itemsQuery->func()->sum($query->newExpr('Items.quantity * Items.unit_price'))]),           ])
        ]);


Notice that we are using cleanCopy(), this is useful when the same Query object is affected previously by a select(), from() or where clauses, if you run this same example without using cleanCopy() you will get unexpected results. 

The SQL query generated is this:

SELECT ProductDetails.id AS id,
       ProductDetails.price AS price,
       ProductDetails.quantity AS quantity,
       ProductDetails.display_name AS display_name,
       ProductDetails.quantity_sold AS quantity_sold,
       ProductDetails.income AS income,
       (ProductDetails.quantity - ProductDetails.quantity_sold) AS stock
FROM
  (SELECT Products.id AS id,
          Products.price AS price,
          Products.quantity AS quantity,
          (CONCAT(Products.name, :param0, Products.description)) AS display_name,

     (SELECT (SUM(Items.quantity)) AS SUM
      FROM items Items
      WHERE Items.product_id = (Products.id)) AS quantity_sold,

     (SELECT (SUM(Items.quantity * Items.unit_price)) AS SUM
      FROM items Items
      WHERE Items.product_id = (Products.id)) AS income
   FROM products Products) ProductDetails


CakePHP QueryBuilder gives a ton of possibilities to create queries with clean and robust code. So go play with it and enjoy!


Latest articles

CakePHP AI Integration: Build a CakePHP MCP Server with Claude

Learn how to build a CakePHP MCP server (local) for AI integration.

Intro

Unless your crew left you stranded on a desert island earlier this year, I'm sure you've heard about every big name in the industry integrating their applications and exposing their data to "agents". Model Context Protocol https://modelcontextprotocol.io/docs/getting-started/intro was created to define how the your application could interact and provide features to Agents. These features could be readonly, but also methods (or tools) to allow the Agent operate with your application, for example, creating orders, updating post titles, reordering invoices, or creating reports for your bookings. As a developer, this is a quick win! Providing access, even readonly, could expand the quality of the interaction between your users and your application. In my opinion, the benefits are: Agents deal with context very well, they can use the conversation history, and also extract required data to use the available tools. Agents can transform the data, providing "features" to your users that you didn't implement. For example building charts on the fly, or creating scripts to transform the data for another tool. Quickly after the publication of the MCP protocol, the PHP community started working on a standarized SDK to help with the implementation of MCP servers. Even if the SDK is in active development right now, we are going to explore it and build a local MCP server, connecting Claude Desktop to it. The idea behind the example is to open your application to Claude Desktop, so the Agent (Claude) can connect directly to your code using the specified tools. For production environments, there are many other considerations we should be handling, like authorization, rate limiting, data exchange and privacy, etc. We'll leave all these production grade issues for another day and jump into an example you can implement "today" in your CakePHP application. Development vs. Production: This tutorial focuses on a local development setup for your CakePHP MCP server. Production environments require additional considerations including:
  • Authentication and authorization
  • Rate limiting
  • Data privacy and security
  • Audit logging
  • Input validation and sanitization
  • Error handling and monitoring

What is a CakePHP MCP Server?

A CakePHP MCP server is a specialized implementation that allows AI agents like Claude to interact with your CakePHP application through the Model Context Protocol. This CakePHP AI integration creates a bridge between your application logic and AI capabilities, enabling:
  • Natural language interfaces for complex queries
  • Automated content generation and management
  • Real-time data analysis and reporting

Prerequisites

Before starting, ensure you have:
  • PHP 8.1 or higher
  • Composer
  • SQLite or MySQL
  • Claude Desktop (free tier available)

Step 1: Set Up the CakePHP CMS Application

We'll use the official CakePHP CMS tutorial. # Clone the repository git clone https://github.com/cakephp/cms-tutorial cd cms-tutorial # Install dependencies composer install # Run database migrations bin/cake migrations migrate # Start the development server bin/cake server

Create a Test User

  1. Navigate to http://localhost:8765/users/add
  2. Create a new user with your preferred email and password
  3. Log in at http://localhost:8765/users/login
  4. Verify you can create an article via http://localhost:8765/articles/add

Step 2: Install Claude Desktop

Download and install Claude Desktop from https://claude.com/download

Step 3: Install the CakePHP MCP Plugin

To build your CakePHP MCP server, install the MCP utility plugin and SDK in your CakePHP project: composer require cakedc/cakephp-mcp:dev-2.next-cake5 mcp/sdk:'dev-main#4b91567' Note: These packages are in active development.

Step 4: Create the CakePHP MCP Server Script

Create a new file bin/mcp to initialize your CakePHP MCP server: #!/usr/bin/env sh cd /absolute/path/to/your/cms-tutorial && php vendor/cakedc/cakephp-mcp/bin/mcp-server Important: Replace /absolute/path/to/your/cms-tutorial with your actual project path. For example: /home/user/cms-tutorial or C:\Users\YourName\cms-tutorial Make the script executable: chmod +x bin/mcp

Step 5: Create Your First CakePHP MCP Tool

Create the file: src/Mcp/Articles.php <?php namespace App\Mcp; use App\Model\Entity\Article; use Cake\ORM\Locator\LocatorAwareTrait; use Mcp\Capability\Attribute\McpTool; class Articles { use LocatorAwareTrait; #[McpTool(name: 'createArticle')] public function createArticle(string $title, string $body): array { try { $article = new Article([ 'title' => $title, 'body' => $body, 'user_id' => $this->fetchTable('Users')->find()->firstOrFail()->id, // a default user ID for simplicity ]); if (!$this->fetchTable('Articles')->save($article)) { return [ 'success' => false, 'message' => 'Failed to create article: ' . json_encode($article->getErrors()), ]; } return [ 'success' => true, 'message' => 'Article created successfully', ]; } catch (\Throwable $e) { return [ 'success' => false, 'message' => 'Exception to create article: ' . $e->getMessage(), ]; } } } The #[McpTool] Attribute: This PHP 8 attribute registers the method as an MCP tool that Claude can discover and use in your CakePHP AI integration. The name parameter defines how Claude will reference this tool. Simplified User Assignment: For demonstration purposes, we're using the first available user. In production CakePHP AI integrations, you'd implement proper user authentication and context.

Step 6: Configure Claude Desktop for CakePHP MCP Integration

Add your CakePHP MCP server to Claude Desktop's configuration:
  1. Open Claude Desktop
  2. Go to Settings → Developer → Edit Config
  3. Add your MCP server configuration:
{ "mcpServers": { "cakephp-cms": { "command": "/absolute/path/to/your/cms-tutorial/bin/mcp" } } }
  1. Save the configuration and restart Claude Desktop

Step 7: Test Your CakePHP AI Integration

Once Claude Desktop restarts, you should see your CakePHP MCP server connected:
  1. MCP Server Connected: Look for the server indicator in Claude Desktop showing your CakePHP MCP integration is active
  2. Available Tools: You can view available CakePHP MCP tools by clicking the tools icon
  3. The createArticle tool: Should appear in the list of available tools
  4. Now you can use the Claude Desktop prompt to generate articles, that will be saved directly into your CakePHP application!

Wrapping up

You've successfully built a CakePHP MCP server and implemented CakePHP AI integration with Claude! This Model Context Protocol CakePHP implementation opens up powerful possibilities for AI-enhanced user experiences and automation in your web applications.

CakeFest 2025 Wrap Up

For years I have heard the team talk about Madrid being one of their favorite cities to visit, because they hosted CakeFest there more than a decade ago. I can now confirm… they were right! What a beautiful city. Another great CakeFest in the books… Thanks Madrid!   Not only are we coming down from the sugar high, but we are also honored to be celebrating 20 years of CakePHP. It was amazing to celebrate with the attendees (both physical and virtual). If you watched the cake ceremony, you saw just how emotional it made Larry to reminisce on the last 20 years. I do know one thing, CakePHP would not be where it is without the dedicated core, and community.    Speaking of the core, we had both Mark Scherer and Mark Story joining us as presenters this year. It is a highlight for our team to interact with them each year. I know a lot of the other members from the core team would have liked to join us as well, but we hope to see them soon. The hard work they put in day after day is unmatched, and often not recognized enough. It’s hard to put into words how grateful we are for this group of bakers.    Our event was 2 jam packed days of workshops and talk presentations, which you can now see a replay of on our YouTube channel (youtube.com/cakephp). We had presenters from Canada, Germany, India, Spain, USA, and more! This is one of my favorite parts about the CakePHP community, the diversity and representation from all over the world. When we come together in one room, with one common goal, it’s just magical. Aside from the conference itself, the attendees had a chance to network, mingle, and enjoy meals together as a group.  I could sense the excitement of what’s to come for a framework that is very much still alive. Speaking of which… spoiler alert: CakePHP 6 is coming. Check out the roadmap HERE.   I feel as though our team leaves the event each year with a smile on their face, and looking forward to the next. The events are growing each year, although we do like to keep the small group/intimate type of atmosphere. I am already getting messages about the location for next year, and I promise we will let you know as soon as we can (when we know!). In the meantime, start preparing your talks, and send us your location votes.   The ovens are heating up….

Polymorphic Relationships in CakePHP: A Beginner's Guide

Have you ever wondered how to make one database table relate to multiple other tables? Imagine a comments table that needs to store comments for both articles and videos. How do you manage that without creating separate tables or complicated joins? The answer is a polymorphic relationship. It sounds fancy, but the idea is simple and super powerful.

What's a Polymorphic Relationship?

Think of it this way: instead of a single foreign key pointing to one specific table, a polymorphic relationship uses two columns to define the connection. Let's stick with our comments example. To link a comment to either an article or a video, your comments table would have these two special columns:
  1. foreign_id: This holds the ID of the related record (e.g., the id of an article or the id of a video).
  2. model_name: This stores the name of the model the comment belongs to (e.g., 'Articles' or 'Videos').
This flexible setup allows a single comment record to "morph" its relationship, pointing to different types of parent models. It's clean, efficient, and saves you from a lot of redundant code. It's not necessary for them to be called "foreign_id" and "model_name"; they could have other names (table, model, reference_key, model_id, etc.) as long as you maintain the intended function of each. Now, let's see how you can set this up in CakePHP 5 without breaking a sweat.

Making It Work in CakePHP 5

While some frameworks have built-in support for polymorphic relationships, CakePHP lets you create them just as easily using its powerful ORM (Object-Relational Mapper) associations. We'll use the conditions key to define the polymorphic link.

Step 1: Set Up Your Database

We'll use a simple schema with three tables: articles, videos, and comments. -- articles table CREATE TABLE articles ( id INT AUTO_INCREMENT PRIMARY KEY, title VARCHAR(255) ); -- videos table CREATE TABLE videos ( id INT AUTO_INCREMENT PRIMARY KEY, title VARCHAR(255) ); -- comments table CREATE TABLE comments ( id INT AUTO_INCREMENT PRIMARY KEY, content TEXT, foreign_id INT NOT NULL, model_name VARCHAR(50) NOT NULL ); Notice how the comments table has our special foreign_id and model_name columns.

Step 2: Configure Your Models in CakePHP

Now for the magic! We'll define the associations in our Table classes. ArticlesTable.php In this file, you'll tell the Articles model that it has many Comments, but with a specific condition. // src/Model/Table/ArticlesTable.php namespace App\Model\Table; use Cake\ORM\Table; class ArticlesTable extends Table { public function initialize(array $config): void { // ... $this->hasMany('Comments', [ 'foreignKey' => 'foreign_id', 'conditions' => ['Comments.model_name' => self::class], // or 'Articles' 'dependent' => true, // Deletes comments if an article is deleted ]); } } Use self::class is a best practice in modern PHP, as it prevents bugs if you ever decide to rename your classes, and your IDE can auto-complete and check it for you VideosTable.php You'll do the same thing for the Videos model, but change the model_name condition. // src/Model/Table/VideosTable.php namespace App\Model\Table; use Cake\ORM\Table; class VideosTable extends Table { public function initialize(array $config): void { // ... $this->hasMany('Comments', [ 'foreignKey' => 'foreign_id', 'conditions' => ['Comments.model_name' => self::class], // or 'Videos' 'dependent' => true, ]); } } CommentsTable.php This table is the owner of the polymorphic association. You can add associations here to easily access the related Article or Video from a Comment entity. // src/Model/Table/CommentsTable.php namespace App\Model\Table; use Cake\ORM\Table; class CommentsTable extends Table { public function initialize(array $config): void { // ... $this->belongsTo('Articles', [ 'foreignKey' => 'foreign_id', 'conditions' => ['Comments.model_name' => \App\Model\Table\ArticlesTable::class], // or 'Articles' ]); $this->belongsTo('Videos', [ 'foreignKey' => 'foreign_id', 'conditions' => ['Comments.model_name' => \App\Model\Table\VideosTable::class], // or 'Videos' ]); } }

Step 3: Using the Relationship

Now that everything is set up, you can fetch data as if it were a normal association. Fetching Comments for an Article: $article = $this->Articles->get(1, ['contain' => 'Comments']); // $article->comments will contain a list of comments for that article Creating a new Comment for a Video: $video = $this->Videos->get(2); $comment = $this->Comments->newEmptyEntity(); $comment->content = 'This is an awesome video!'; $comment->foreign_id = $video->id; $comment->model_name = \App\Model\Table\VideosTable::class; // or 'Videos' $this->Comments->save($comment); As you can see, the model_name and foreign_id fields are the secret sauce that makes this pattern work.

What About the Future? The Power of This Solution

Now that you've got comments working for both articles and videos, what if your app grows and you want to add comments to a new model, like Photos? With this polymorphic setup, the change is incredibly simple. You don't need to alter your comments table at all. All you have to do is: Create your photos table in the database. Add a new PhotosTable.php model. In the new PhotosTable's initialize() method, add the hasMany association, just like you did for Articles and Videos. // src/Model/Table/PhotosTable.php namespace App\Model\Table; use Cake\ORM\Table; class PhotosTable extends Table { public function initialize(array $config): void { // ... $this->hasMany('Comments', [ 'foreignKey' => 'foreign_id', 'conditions' => ['Comments.model_name' => self::class], 'dependent' => true, ]); } } That's it! You've just extended your application's functionality with minimal effort. This demonstrates the true power of polymorphic relationships: a single, scalable solution that can easily adapt to your application's evolving needs. It's a key pattern for building flexible and maintainable software.

Conclusion

This approach is flexible, scalable, and a great way to keep your database schema simple. Now that you know the basics, you can start applying this pattern to more complex problems in your own CakePHP applications!

We Bake with CakePHP